Category: Social Media

  • Adding Music to Your Special Day

    Adding Music to Your Special Day

    When was the last time you stepped into a group or a dance club and saw the majority of people seated in their seats? One of the aims of funky energetic rhythms is to fill the dance floor with people who love dancing, sweating, and feeling the vibes of soulful music to alleviate anxiety and tension after a hard day at work. Weddings aren’t complete without popular music. Most ceremonies are boring and uninteresting without music. Giving your most special occasion music a personal touch will turn out to be the most exciting event of the day. Music brings a lovely and emotional touch to your wedding and reception. Furthermore, the music and songs you pick will help to personalize your wedding. Here are some ideas for using music to enhance the various stages of your wedding. For your ceremony and reception, you’ll most likely choose two styles of music: softer, intimate music to be performed or sung before, during, and after the ceremony, and fun or dancing music for the reception. 

    In certain cases, the same musicians may perform both roles. You may also employ a set of musicians for the service, and a band or entertaining DJ for the reception. Instrumentals may create an atmosphere for your guests and can include mood-setting pieces that your early-arriving guests can appreciate while waiting for the show to begin if you wish to have music playing before the ceremony. For example, a pre-ceremony reception or cocktail hour is popular in traditional Jewish ceremonies, during which the bride and groom have separate chambers in which to welcome guests, as well as a common area where hors d’oeuvres and drinks are served. It’s fun to have musicians and maybe a singer in the common area to “warm up” the guests with some gentle or lively music at this time. And chamber music will blend in nicely.

    Check with your site planner before the ceremony to see if there are any limits or limitations on music choices. Some places of worship restrict the music options to what their organist is capable of playing. When approved, however, you can employ a harpist, violinist, string quartet, trumpeter, saxophonist, classical guitarist, keyboardist, flautist, and vocals or choir for your ceremony music.

    The music at your reception and pop culture can range from a subtle background feature during dinner to energetic dance music. A string quartet, violin, or harp, for example, will provide a polished backdrop for your case, while a rock band or 12-piece orchestra will provide a broader variety of vibrant tunes. If you and your fiancé are both major music fans, you might have different bands or even a DJ substitute with a band that specializes in your favorite genre(s) at the reception, whether it’s jazz, rap, or pop. Your personal style may also reflect your ethnic background, such as Latin, Klezmer, or Irish step dancing.

    While a live band may tend to be the pinnacle of wedding reception entertainment, bear in mind that most won’t have the same range as a seasoned DJ. When you make plans for something to be played during the band’s planned breaks, there will be “dead air” during that period. If you employ a DJ, make sure you hire someone who is both knowledgeable and entertaining, and who can play a wide range of music, from slower traditional to 1950s rock and roll to faster contemporary dance music.

  • Reasons To Hire A Worker’s Compensation Lawyer

    Reasons To Hire A Worker’s Compensation Lawyer

    A worker’s compensation lawyer is a kind of personal injury lawyer who helps settle a case that has occurred because of negligence at a job. Many times work injuries can make it impossible for you to work. This very well could cause a lot of financial and emotional stress for you, adding to the medical costs, treatment, etc. 

    You won’t be able to return to work in cases like this when an injury has occurred at your job. You will need to seek a workers compensation lawyer that will fight your case. 

    Here are a few reasons why you should hire a workers comp attorney

    Can help in reigniting claim

    A worker’s compensation lawyer can work to recognize your claim after the injury has occurred. Getting your compensation is often a very lengthy procedure, and there are a lot of proceedings. Many times injured workers do not get their claims validated, and the company does not agree that the incident happened. In these cases having a workers compensation attorney is a good idea. They help you in building a strong case, working towards getting you the compensation that you deserve. Moreover, they can help you by finding the best evidence showing what really happened. All of this works towards drawing a favorable settlement that will help ease your financial burden. 

    These attorneys know all the proceedings well and will get the correct evidence from medical practitioners and other people who have seen the incidents.  They also arrange the recording of all the experts and coworkers’ medical depositions necessary for building a strong case. 

    Help in improving negotiation

    Having a personal injury lawyer helps in negotiating with the insurance company. Many times self-representation is very challenging. Hiring a professional on your team ensures that these cases are handled well. Lawyers go through the routine proceedings with many years of experience and get the decision in your favor, should it come to that. Most cases are settled long before they go to a courtroom. Attorneys are always aware that a satisfactory settlement can be made, and the insurance company could very well pay you the full compensation you deserve. 

    Help in framing a good agreement

    A worker’s compensation lawyer will ensure that all the agreements are drawn correctly. As professionals, a worker’s compensation lawyer will ensure that the deal is done correctly to maximize the benefits. They will represent you in a way that you get the deserved payments. 

    They will also make sure that there are no hidden clauses in your agreement that can cost you money. They will draw a fair deal that will strengthen your chances in court. Many times not all cases are settled with the offending party directly, but through their attorneys.  

    Again, a majority of these cases are settled out of court. However, sometimes the case does have to go to a courtroom. This can often be very costly and time-consuming. A workers compensation lawyer will strengthen your case in court and do everything in their power to get you the entitled compensation. They will fight for your case while you recuperate from an injury. 

  • Find Out Why Tax Consultancy is Your Best Friend

    Find Out Why Tax Consultancy is Your Best Friend

    Tax is a mandatory fee, and you can not escape it. You should not even try to avoid paying tax. You must know that the tax you pay helps the government-run the nation judiciously. But taxation is not a simple payment that needs to be made to the government. It requires planning, expertise, and knowledge of the law. Both individuals and organisations need tax consultancy for better tax optimisation. 

    It is not possible to know every aspect of tax and payments on your own. As the business owner, you have several other issues to deal with, and you cannot make any mistake. Moreover, the tax is a big thing. You can not afford blunders here. So it is better to have experts on board who can assist and guide you with all the policies and judge how they can be advantageous to you. 

    Who is a Tax Consultant?

    Tax is an integral part of everyone’s life; you can not leave it to someone who does not have accurate knowledge. A tax advisor helps people and organisations pay their taxes efficiently. They have expertise in tax law, tax planning, and tax compliance. Since they are in the industry for the long run, they have in-depth know-how and stay updated with new policies and regulations. Tax consultants help in filing of returns too so that the client minimises his/her tax liabilities. With that said, tax consultancy assists you to pay only the required tax and also does not cost too much. 

    There are various aspects of who is a good tax consultant and can guide you to what is best. To understand better, you need to read further. 

    Tax Consultancy work

    Tax consultants know everything about tax rules and regulations. They stay updated and assist individuals and businesses for short term and long term tax positioning. Apart from guiding about tax and policies, tax consultancy services also offer the following.

    1. They carry out tax documentation.
    2. The consultants help you file e returns.
    3. They evaluate tax payer’s financial and legal situations to determine tax liabilities.
    4. They assist in completing tax forms.
    5. They help with investment, insurance, pension plans, child plans, and other tax-saving schemes by the government.
    6. Not only these, but they also offer tax filing for freelancers.

    Many times, people get confused between an accountant and a tax advisor. Both are two different professions. While an accountant maintains books of accounts and gives general tax advice, a tax consultant gives you legal tax advice with their deep intellect and knowledge about various tax laws and exemptions. An accountant performs all-encompassing roles related to the accounts. On the other hand, tax advisors are experts only in tax-related subjects.

    Responsibilities of a Tax Consultant

    A tax consultant saves you from making any mistake in the complete taxation process. They also help to use tax saving schemes appropriately. When you hire a tax consultancy service, you get to share the following responsibilities. 

    • Preparing simple and complex tax returns.
    • Determining whether you have paid less or paid extra. 
    • Gathering information and using it to derive benefits.
    • Using the latest technology to file tax returns. 
    • Keeping updated information about the new taxation policies. 
    • Understanding rules and regulations. 

    Benefits of hiring tax consultancy service provider

    For many people, the process of tax filing and returns is daunting. Laws change frequently, and keeping up to date information becomes difficult. An average taxpayer gets lost in the myriad of rules of government deductions, credits, tax savings, and schemes. He is prone to making mistakes that can lead to overpayment and underpayment of taxes. Both circumstances are not in favour of any person. In the case of underpaid taxes, you may be penalised, and in case of extra payment, you may lose the rightful money. So it is in benefit of you to hire a tax consultancy service to lessen a burden. Following points support the statement. 

    • With a tax consultant’s help, you can identify the tax deductions you can avail in the entire year. They also help to make investments to avoid any tax liability.
    • Most organisations and individuals do not pay heed to taxation in the entire year and decide in haste at the end. If you have tax advisors, you need not invest a lot of your time and effort for this purpose. 
    • It is always better to have an expert opinion. And when it comes to taxation, you can not take a risk. So it is better to reach out to a tax consultancy and seek advice. 
    • Tax consultants have a pool of knowledge. You can grab so much out of it if you have one in your acquaintance. 

    If you make a wrong decision once, it will hold you back always, to avoid any such situation you must hire a tax consultant and stay on the safer side. 

  • 12 Questions You Might Be Afraid to Ask About Social Media

    12 Questions You Might Be Afraid to Ask About Social Media

    C:\Users\HA VAN DONG\Downloads\famoid.jpg

    Social media has become an integral part of our life these days. Recent numbers reveal that almost seven out of ten Americans prefer using social media on regular basis. Furthermore, almost 75% of the Facebook users open their profile at least once every day. These channels have now changed the way we communicate with friends and relatives. But even after enjoying several benefits of these social media channels, you may still have some questions in your mind that you are afraid to ask. 

    In this article, we are breaking down some of the most embarrassing questions about social media to help you find reliable answers to them. 

    Q1. Do I need to be active on all three platforms?

    You might have heard that Facebook, LinkedIn, and Twitter are popular among business owners and professionals. These platforms help them gain higher credibility online. But a general question in every mind must be whether it is important to be present on all these platforms or not. Well, if you are a business owner, this decision is totally based on your niche audience. If the majority of them are available on Facebook, your main goal must be this platform only. On the other side, if as a research professional, you can find solid connections via LinkedIn. You can make a market analysis first to analyze which platform will be best for your specific goals and then create your profile accordingly.

    Q2. What is hashtagging?

    Hashtags are basically some keyword phrases that do not have spaces between words. These keywords have a # sign before them. Experts recommend them as the best choice to leverage a solid digital marketing strategy. They give your viewers a connectivity option between similar kinds or theme-based posts. General rules say that hashtag should not have punctuation.

    Q3. What if I accidentally like a photo? Will they come to know even if I unlike it immediately?

    Sometimes, linking photographs of someone whom you are stalking secretly online turns out to be very embarrassing. It happens with many of us and sometimes we end up liking the photo of our ex on Facebook or Instagram. Unfortunately, social media sends an immediate notification to others when you like their photo, and even if you unlike it afterward, the original notification will not be changed. So, there is no way to erase this information. 

    Q4. Will another person know if I block them?

    This completely depends upon which platform you are using. For instance, the algorithms on Instagram and Facebook do not alert users if someone has blocked their profiles. They simply hide the person whom you are interested to ignore. But in the case of Twitter, a person will receive a specific message when they visit a profile that has blocked them. In case if you are not able to locate the profile of someone you know very well on Facebook but it disappeared somewhere, possibly they have blocked you. 

    Q5. What exactly social media websites, such as Facebook know about me?

    You might have already heard that social media sites may use your personal information for business needs. Well, this is true. Facebook already says that the data of users can be sold to some advertisers so that they can receive promotional messages of relevant brands. As this social media website is working with some business mindset, they give more importance to the location, age, sex, and specific interests of individuals. 

    Q6. Is it okay to share content or news from other sources?

    In simple terms – Yes. You can use posts from some other users or company pages and share them via your profile without worrying about any legal issues. In fact, this is an integral part of the social media communications here people keep on sharing each other’s posts. The same strategy is followed by business owners to spread awareness about their brand in the market. 

    Q7. If I save someone’s post, will they get notified?

    The answer to this question is again dependent on the platform that you are using. Instagram doesn’t bother if you save or take a screenshot of someone’s post. This platform doesn’t even send alerts to the original owner of the content regarding your screenshots. But if this action is with respect to the stories that expire over time, the users will receive an alert for the same. However, this is not the same on Twitter and Facebook platforms. It is possible to capture a screenshot of a live video or Facebook story without letting the other person know about it. 

    Q8. Can someone come to know if I search their profile?

    We all do this at some stage and this may sound very embarrassing if the other person gets notified about your secret visit to their profile. But thankfully, Facebook, Instagram, and Twitter do not alert other users if someone has visited their profile. This history stays within your account only. On the other side, the LinkedIn platform is designed for building professional relationships, and therefore, the algorithms here send instant alerts to other users regarding your profile visits. 

    Q9. Is it possible to stop seeing someone’s post without even unfriending them?

    Sometimes, we cannot unfriend a person whose repeated posts appear annoying to us. But it is possible to get rid of all the drama by simply unfollowing that person. When you unfollow a person, their posts will no longer appear on your timeline and the best part is that other people will have no idea about what you did. 

    Q10. Can people see embarrassing posts that I have already deleted?

    The great news is that all social media platforms give users complete authority to decide the visibility of their posts. If you delete some posts, they will no longer be visible to anyone. However, if someone has captured screenshots of those posts, that may still be a trouble for you. 

    Q11. My social media handles must be consistent?

    Yes. Your social media handles must be consistent so that other people and clients can recognize your profile with ease. There are so many profiles and pages that have a common name; in this scenario, social media handles play an important role to identify the right person online. 

    Q12. What is the best time to post on social media?

    If you are an individual using social media for fun, there should be no time-related restriction for your posts. But if you are running a business on social media; it is important to be specific about the timing of your social media posts. They may be aligned to the time routines of your target audience so that you can receive enhanced visibility. You can also take help from professionals at Famoid to make the best decisions about the timing and quality of your social media posts.

  • Understanding IPTV Service

    Understanding IPTV Service

    In the evolving landscape of television and video consumption, Internet Protocol Television (IPTV) has emerged as a transformative technology. This service utilizes internet protocols to deliver television content, offering an innovative alternative to traditional cable and satellite TV. As the digital age progresses, IPTV is redefining how viewers access and interact with their favorite shows, movies, and live broadcasts. If you want best IPTV service choose Peoplestv.nu, a Swedish IPTV service. Their website is in Swedish, catering to a Swedish audience. They offer a vast selection of over 10,000 TV channels, 5,000 movies, and 2,500 series, with subscriptions starting at 99 SEK for 10 days.

    The Basics of IPTV

    IPTV stands for Internet Protocol Television, a system where television content is delivered over the internet rather than through conventional terrestrial, satellite, or cable television formats. By using internet protocols, IPTV  service like  peoplestv.nu provides a flexible and efficient method of streaming media content directly to the viewer’s device, whether it be a television, computer, or mobile device.

    How IPTV Operates

    The operation of IPTV involves several key components. Initially, content is aggregated from various sources, including live TV channels, video-on-demand libraries, and catch-up TV services. This content is then encoded and compressed to optimize it for delivery over the internet. Streaming servers store the encoded content, distributing it through content delivery networks (CDNs) to ensure high availability and low latency. Viewers access the content through set-top boxes connected to their televisions or via apps on smart devices, which decode the IPTV streams for playback.

    Types of IPTV Services

    IPTV services can be broadly categorized into three types: live television, video on demand (VOD), and time-shifted TV. Live television provides real-time broadcasts of TV channels, making it ideal for watching news, sports, and events as they happen. Video on demand allows users to select and view content at their convenience, offering extensive libraries of movies, TV shows, and documentaries. Time-shifted TV, or catch-up TV, lets viewers watch previously aired programs, providing flexibility for those who miss live broadcasts.

     Advantages of IPTV

    One of the primary benefits of IPTV is its flexibility and convenience. Users can access content on various devices, including smartphones, tablets, and laptops, in addition to traditional televisions. This multi-platform access significantly enhances the viewing experience. IPTV also offers a vast content library, with a wide range of international channels, niche genres, and extensive VOD options catering to diverse tastes. Additionally, IPTV supports interactive features such as pausing, rewinding, and fast-forwarding live TV, along with supplementary content like trailers and reviews. Furthermore, IPTV can be more cost-effective than traditional cable or satellite TV, particularly when bundled with internet services.

    Challenges Facing IPTV

    Despite its numerous advantages, IPTV faces several challenges. High-quality IPTV streams require significant bandwidth, and in areas with poor internet connectivity, users may experience buffering and reduced video quality. Content licensing is another hurdle, as securing licenses can be complex and expensive, requiring providers to navigate intricate legal and regulatory landscapes. Technical issues also pose a risk, with IPTV services heavily reliant on internet infrastructure. Network congestion, server outages, and technical glitches can disrupt the viewing experience. Moreover, the digital nature of IPTV makes it susceptible to piracy, necessitating robust security measures to protect content and revenue.

    The Future of IPTV

    Looking ahead, the future of IPTV appears bright, driven by technological advancements and changing consumer behaviors. The rollout of 5G networks promises to alleviate bandwidth concerns, providing faster and more reliable internet connections capable of supporting high-definition and 4K streaming. Artificial intelligence and machine learning technologies are set to enhance user experiences through personalized content recommendations, adaptive streaming quality, and interactive features. As smart TVs become more widespread, the integration of IPTV services will become seamless, offering a unified and intuitive viewing experience. Furthermore, the global expansion of high-speed internet will enable IPTV to reach new markets, providing diverse content to a broader audience.

    Conclusion

    IPTV is revolutionizing the way we consume television and video content, offering unprecedented flexibility, convenience, and choice. While it faces challenges such as bandwidth requirements, content licensing, technical issues, and piracy concerns, ongoing advancements in technology and infrastructure are paving the way for a promising future. As IPTV continues to evolve, it is poised to become a dominant force in the entertainment industry, reshaping our viewing habits and expectations. With its potential to offer a more personalized and interactive viewing experience, IPTV is set to redefine television for the digital age.

  • How to Record a Presentation with Audio and Video for you Work

    How to Record a Presentation with Audio and Video for you Work

    We have all tried standing next to our screens and recording our presentations, having no clue whether the writing on the screen shows or not. Preparing PowerPoint Presentations with such devotions but not being able to give a good presentation because of the video quality is quite the heartbreak. This is why record powerpoint presentation is very important. Whether you are presenting in the moment or want to pre-record it to give extra effects, it will serve you beneficially.

    While there are many ways to record your presentations, using Wondershare DemoCreator gives you high quality activity and an easy-to-use experience. The downloadable software allows you to screen record your PC along with audio and video-cam recording to create personalized videos. It allows you to export the video and save it as MP4, MP3, MOV, WMV, AVI, GIF, etc. as well.

    Download and Install

    It is fairly easy and simple to download the software; you’ll follow the same steps as for any other file. To avoid a scam and harm to your computer, make sure you download it from the official website. After the downloading process, click open the file and follow the instructions for the installation process to initiate.

    How to Record your Presentation in 3 easy steps

    Everyone has a busy schedule and a ton of work to do. After spending an elaborate amount of time creating your presentation, you want to get done with the video recording part quickly. This is where the Wondershare DemoCreator comes into play; it makes it extremely easy to record while viewing or during an ongoing presentation. 

    Step 1:

    Upon opening the app, a window will appear in front of you. Click ‘Capture’ if you want to start screen recording. Following this, a window will appear showing you the screen size you will need. There are three options out of which you can select your preference; you can manually type the dimensions of the screen that you require as well. 

    Step 2:

    After this, you can also set your recording device. Here the webcam option will let you record from your webcam or device’s built in camera. You can also control whether you want to use the system’s mic or a separate microphone. You will be able to turn all three of these things on and off as you will.

    Step 3:

    Setting your recording screen size means you are good to go. You can now start recording. A few quick tips to remember is that the F9 key on your keyboard can be used to pause or resume the recording whilst the F10 key allows you to stop recording.

    Editing

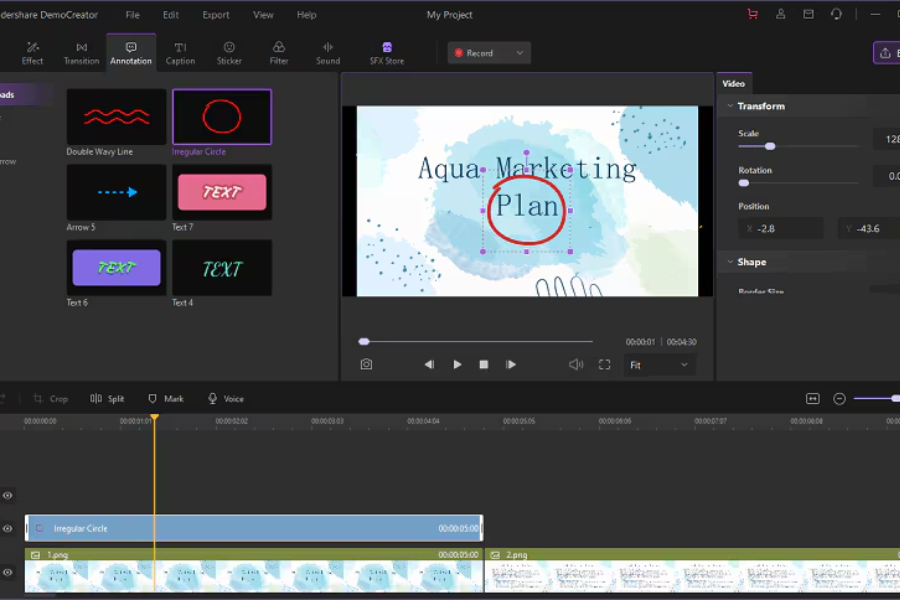
    Once you have finished recording, you automatically get directed to the editing window where you can customize your video the way you please, making it more innovative. It helps you crop, rotate, edit and merge videos to make it more interactive. There are many things you can try like annotations, stickers, transitions, green screen effects etc.

    ●  Annotations: These are small text boxes that you can insert anywhere you like in the video and explain the context wherever needed.

    ●  Captions: You can add different effects to your captions to make it more captivating. You can make your video more interactive by adding themes, title, subtitles and more.

    ●  Stickers: You have the option of adding stickers of your choice to different parts of the video to make it more colorful and appealing.

    ●  Transitions: This effect allows enchanting transitions in between different scenes. The transitions include swirl, fade, erase, morph, etc. and a different transition can be added to each changing slide or video.

    ●  Cursor: This feature allows you to customize your cursor. If you want to bring attention to a specific part of your video, you can highlight your cursor or even add a ring and click to the sound. This effect is also present on the left side of the window along with transition effects, stickers, captions, annotations etc.

    ●  Green Screen: You are presenting but the background is not suitable? Well no worries because this app also has an authentic green screen feature. You can optimize your background by changing it easily and create the perfect atmosphere for your presentation.

    ●  Crop and Split: The crop and split icons are present next to each other. You can crop the video according to your preferred ratio. At the same time, the split feature allows you to dissect the video into different parts. You can cut the portion of the video and adjust it onto some other part or remove it altogether.

    ●  Snapshot: the software also allows you to take snapshots of the screen in different parts of your video to include those pictures later on if needed. Later, you can crop the picture in dimensions that suit you best.

    ●  Noise Removal and Voiceover: This option allows you to record and add audio to the video in case you think the description missed something or you want to add additional information. Moreover, you can also remove the previously existing audio from the video in case you think it is invalid or do not want it. Instead, you can replace it with a new one that you desire.

    All of these features that are available in the Wondershare DemoCreator allow you to customize your video according to your own preference, making it more interactive. 

    Conclusion

    It’s time we forget the old, lesser convenient ways of making presentations and opt for the conditions that are faster and easier to do. This video and audio recording app is free to download and is there to make our life simpler. 

    DemoCreator is definitely reliable and offers a ton of features and tools to make your video great. Whether you are a professional or a novice, you will get the most splendid experience from this video and audio recorder.

  • HOW TO RECORD YOUR SCREEN ON MAC WITH WONDERSHARE DEMOCREATOR

    HOW TO RECORD YOUR SCREEN ON MAC WITH WONDERSHARE DEMOCREATOR

    WHY DO I NEED SCREENCASTING?

    Screencasting is a highly important tool in the tech world; although highly simplistic, its applications are tremendously vast, and thus, it can really make a definitive difference in proving and sharing knowledge and information. Be it for leisure activities such as sharing a film clip with a friend of yours, or recording or editing a minor tutorial on your macOS, the screencasting has got you covered. Mac does offer you this essential facility, as it is in-built into your Apple device. However, the built-in system can often fall short of expectations.

    THE BEST ALTERNATIVE THERE IS:

    There are very few alternatives that come as close to getting the job done as the Wondershare DemoCreator downloadable software that enables you to record the events as they unfold on your computer screen, including video, in-display text, and audio (if any at all). Moreover, the Wondershare DemoCreator also provides you with a large variety of editing options that can help you create the perfect video. With a large template of annotations, tickers, captions, transitions, and effects, the DemoCreator is the undisputed best choice.

    HOW DO I RECORD MY SCREEN?

    STEP 1 – First of all you need to go to Wondershare DemoCreator website and download and install the program. Startup the program and you can begin recording your screen by clicking on the New Recording button.

    STEP 2 – A small window for controlling the recording will appear on your screen. You can resize the dotted border to adjust the area of the screen that will be recorded. While resizing, a convenient magnifier tool will allow you to make precise adjustments.

    STEP 3 – There is a large plus icon at the top left corner of the recording area which you can drag to easily reposition your selected recording area. If you wish to revert to full-screen recording then simply press the Shift+F keys.

    STEP 4 – The right side of the window contains the audio and webcam icons. You can click on either to toggle audio and webcam video recording respectively. The devices must be securely connected to your device for best results.

    STEP 5 – A slider allows you to conveniently adjust the microphone audio recording levels for your screen recording.

    STEP 6 – Once everything is set up and you feel ready, just click the big red button to start the recording. You can also press the F10 key to begin recording your screen.

    STEP 7 – Once you have pressed either of the buttons to start the recording, Wondershare DemoCreator screen recording software will begin a 3-second timer before your screen recording is started.

    STEP 8 – During the recording if you feel the need to pause the recording simply press the pause icon or just press the F9 key on your keyboard. Similarly, you can resume recording by pressing the resume icon or again pressing the F9 key.

    STEP 9 – Once the desired content has been recorded you can simply end the recording by either pressing the red End recording button on the menu or using the hotkey F10 to end the recording.

    STEP 10 – Once the recording stops it is saved to the specified location and will be automatically available in the video editor.

    HOW DO I EDIT MY VIDEO?

    The video editing interface contains 4 main areas of focus. These are the timeline, properties window, preview screen, and the media library.

    The media library can be used to import any media files. It also holds a rich collection of effects, montages, and transitional effects as well as annotations and cursor effects. Media in the library can be simply dragged and added to the timeline.

    It is quite easy to mute a clip or detach its audio for separate editing once it is added to the timeline. Simply right-click the clip in the timeline and click on ‘Mute Audio’ to mute the clip. Similarly, you can detach audio by right-clicking on the video and selecting ‘Detach Audio’.

    A separate audio file will be added to the timeline as the detached audio and can be edited independently. Files on the timeline can be split, cut, copied, or deleted as per your requirement. You can add various markers and freeze-frames as well.

    You can adjust the size of the scale of the imported clips by clicking and dragging the corners of the video displayed in the preview window. The properties window is another user interface that allows you to also resize a video as well as adjust options like compositing, video speed, and transformation. It is very easy to use.

    In addition to captured videos, you can also import and edit your own local videos. It is possible to adjust the volume for your clips, denoising the audio, adjusting the playback speed, and the duration of the clips.

    You now possess all the knowledge you need to create the perfect video!

    DOES DEMOCREATOR REALLY GET THE JOB DONE?

    The answer is obviously yes! DemoCreator stands out due to some very special reasons. 

    Most importantly, it accumulates all the major editing tools you’ll need to take care of not only your academic tasks but also any professional work. The wide range of templates offered is unparalleled, and you can salvage a masterpiece with ease. Download for free, commence making brilliant video edits,  and upload to online platforms of your choosing Now.

  • How to Make Screencasts and Editing Better Using Wondershare DemoCreator

    How to Make Screencasts and Editing Better Using Wondershare DemoCreator

    What is more frustrating than not being able to download a video and not having the means to save it as well? You’re watching a great documentary and you want to show it to your friends later on, but there are no means of downloading it. Annoying right? If only there was a way to take snapshots of entire videos like that of pictures.

    Well, now there is a way! The Wondershare DemoCreator makes video recording along with quality audio recording a dream come true. It is a must have video and audio recording software and will fit well in your collection. To help you set it up and get started, this article will walk you through all you need to know.

    What is Screen Recording?

    The meaning of Screen Recording is right there in its name. You can record whatever is visible on the screen of your mobile or PC. This includes recording videos and their audios with clarity as well. It records all the movements on your screen and tracks your clicks or touches on the screen.

    It does not limit the view of the video by remaining fixed in one size. You can set the size as you please to ensure only the part you want to be recorded is within sight. This allows only window or full screen video captures.

    All of these operations are possible with a software like Wondershare DemoCreator; it allows video capturing on your device along with distortion-free smooth audio. You can also control how you can record and edit videos that you capture.

    How to Use Wondershare DemoCreator Screen Recorder 

    Screen Recorders are extremely beneficial and have facilities to accommodate many people, no matter what field. They can be used by gamers to record their victory as proof or to give entertainment during gaming contests. They can be used by university and college professors to share material with students or they can be used by an employee to give a PowerPoint Presentation.

    The screen recorder on the DemoCreator has a ton of incredible easy-to-use features and tools that allow you to share your screen, record videos along with audios, and edit videos to customize them into your own tastes. The great thing is, it does not require a lot of effort either. You can simply create a video and edit it according to your likings for a low price and it will still come out looking great.

    It is important to understand how to conduct operations with your screen recording software to ensure a high quality production. Here is how you can record your screen and audio with the DemoCreator:

    1. Once you launch the software, click on New Recording to initiate your screen recording.

    2. After this, the window will show you the size of the screen to be recorded. You can customize it manually or choose full screen by your choice.

    3. By going into settings available on the top bar you can choose how you want the recording to be done. Set the screen rate.

    4. Set the microphone; whether you’ll be using the system mic or an external microphone.

    5. Set the camera whether it is the in-built camera of the device or a web-cam.

    You are all set for recording your screen. To make the experience more convenient, a few key points to remember is that the F10 key can be used to stop and start the recording whilst the F9 key can be used to pause and play.

    How to Edit your Recorded Video

    The features do not end here. You can edit and personalize your videos to make them more interactive. Here are some of the features that will make your video look more fun and innovative.

    Captions

    You can add themes, title, subtitles and more to your video. Different effects on your captions will give it a more captivating appeal.

    Annotations

    These are small text boxes which you can add in your video wherever you want to place them with text speeches written in them in case you want a more elaborate description in some places.

    Stickers

    The sticker features allows you to paste different stickers in the video as you please making it more colorful and interactive. You can also add emoji stickers, what better way to appeal to your audience?

    Transitions

    This effect allows you to make transitions between your slides or merged videos when changing with a more dramatic effect. It includes swirl, fade, morph, erase, etc.

    Green Screen

    You can now let the worry of your background go. With this green screen effect, you can change your background,whatever it may be, to the one you want. Giving a class to future astrophysicists? Make your background into space!

    Cursor Effect

    Want to bring the attention to a specific part of the video? No worries, this effect allows you to highlight your cursor and give it a ring or a click sound. You can customize your cursor to your needs now.

    Crop

    This is a basic editing tool which lets you crop out the irrelevant portion of your video and keep it concise to the important part.

    Split

    The split feature allows you to cut out a portion of your video thus dissecting it. The removed portion can be deleted altogether or can be adjusted to a different part of the video as you want.

    How to Export your video

    This software lets you export your video to whatever format you think best suits your requirement. You can export the video to MP4, MP3, MOV, WMV, AVI or GIF. After you have done editing your video, click Export.

    A small window will open showing you all the information about the exportation of the file. You can customize the settings and export the video to the set format.

    Conclusion

    Using a screen recording software is fairly simple and provides you with a lot of benefits. So if you do not already have one, download the Wondershare DemoCreator for its incredible features and aids.

  • http://spoke.com/

    http://spoke.com/

    8 Points to Be Considered To Create an Outstanding Resume

    A resume is the starting point of every career. The right resume can help you catch the immediate attention of your employer and distinguish yourself from the crowd. But how exactly do you create an outstanding resume for your great career? Several factors have to be taken into consideration. Below is the list of eight important points to be considered to create the perfect resume:

    Recheck For Typing Errors

    One of the biggest blunders that earn the immediate displeasure of the employers is typing errors. Yet, it is one of the most common errors found in resumes. Typing errors can be quite deceptive and cannot easily be found unless you recheck your document with a keen eye. So go through your resume word by word to avoid any kind of typing errors.

    Take Care of the Grammar

    Although you will mostly write phrases and words in your resume, taking note of the grammar is very important. If you are not careful with the grammar, you are likely to make mistakes. And it can be seen very critically by your prospective employers. If you are unsure about your grammar, then you may rely on free grammar checking apps for help.

    Follow a Template

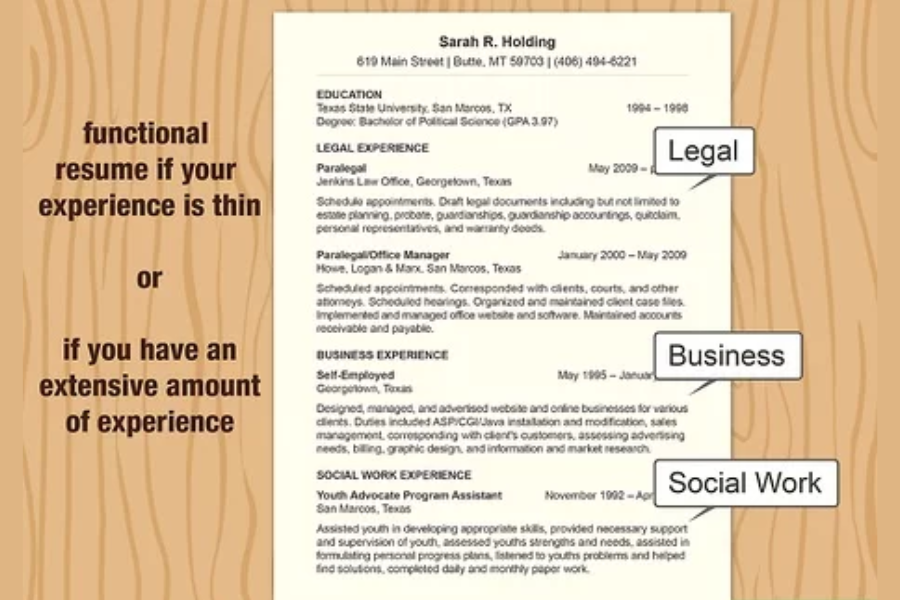
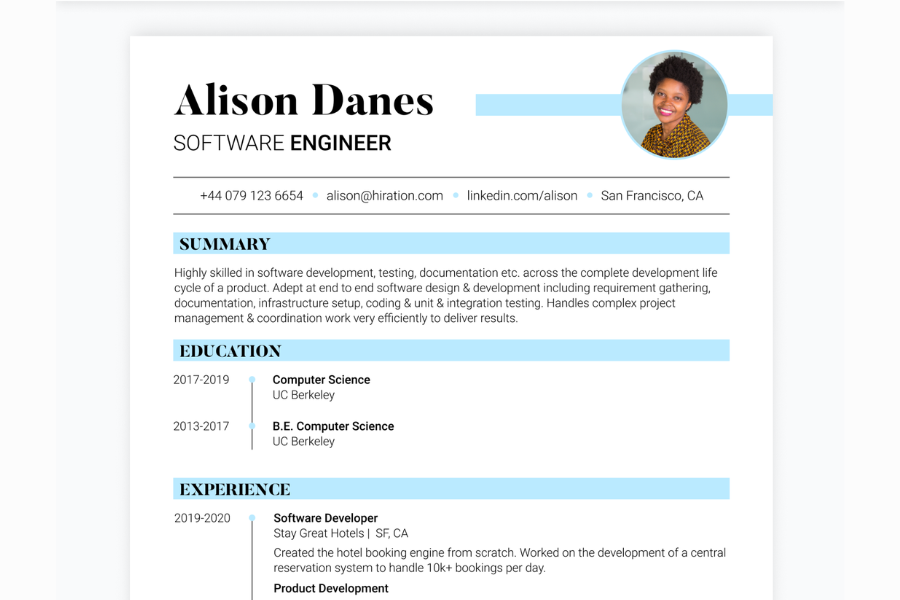
    Unless you have prior experience in writing resumes, creating an outstanding one becomes quite difficult.  You may not know where you should place which information and so on. To solve this problem, professional templates can be of greatest aid. Professional templates can offer you the ideal reference on which you can base your own resume.

    Add the Right Skills

    All that prospective employers are interested in knowing is how you can make the most of the position offered. That is why skills are of the highest importance in any resume. While you may possess a lot of skills, make sure you have listed the ones that are most relevant for the particular post for which you are applying.

    Give a Career Objective

    Many templates may omit the career objective part, but it is nonetheless very important. When your employer sees that your long term goals align with that of the company, they feel more confident about hiring you.

    Add Relevant Experience

    As with the skills, you need to be very specific about the experience you add to your resume. If you add too much irrelevant information, the employer may get bored and miss out on the relevant information as well. So stick to the relevant experience only.

    Check the Length

    As it has been already mentioned, extremely lengthy resumes are bound to bore your employer. Similarly, too little information may also prove to be harmful. A balanced length is what works best for the resumes. So stick to the length that you see on the templates.

    Add a Cover Letter

    Many people hold the opinion that cover letters have fallen out of fashion. But simply sending your resume without a proper introduction for it may steal the effect. So do not omit the cover letter unless you are asked to do so

    Keeping these points in mind, creating an outstanding resume will become as easy as snapping your fingers.